CBM
ASCII-X
BASIC
C128
2MHz Border
BASIC 7.80
BASIC 8
CPM
Digimaster 128
Fast Serial for uIEC
Games
Interlace
JiffySoft128
Keyboard Scan
Media Player 128
Orig Interlace
RGBI to S-Video
RGBI to SCART
RGBI to VGA
RGB Conversion
SAM 128
SID Player 128
VDC Interlace
Mp128alpha
N-progs
D64plus
Disk
Escape Codes
Hardware
PCxface
PETSCII
Pet2asc
Futurama
IBM PC-AT
Contact
Games
Glossary
Hall of fame
Hall of shame
Miscellaneous
Privacy policy
Programming
Twisty puzzles
| Obsolete Notice |
This is the original (old) version preserved for history. Most users should consult the current version.
The Commodore 128 is known to produce interlaced video with the VDC (80-column) video chip, but the memory-mapped and sprite-featured VIC chip is not known for this neat feature. I have created a new video 'mode' which enables an interlaced display (320x400 hi-res or 160x400 multi-color). You can download a demo, Interlace.zip. It contains a D64 disk image, a ReadMe file, and the GNU Public License version 2. The D64 contains 4 files:
- DEMO; a BASIC demonstration program
- CODE 3; a machine language support program
- BM0; half (even rasters) of a bitmap of a circle
- BM1; half (odd rasters) of a bitmap of a circle
(current emulators do not support 400+ VIC rasters)
This program is written for the NTSC video standard. It should not work on a PAL system without customization. There are customization routines built-in so have fun experimenting! Comments, good or bad, can be left.
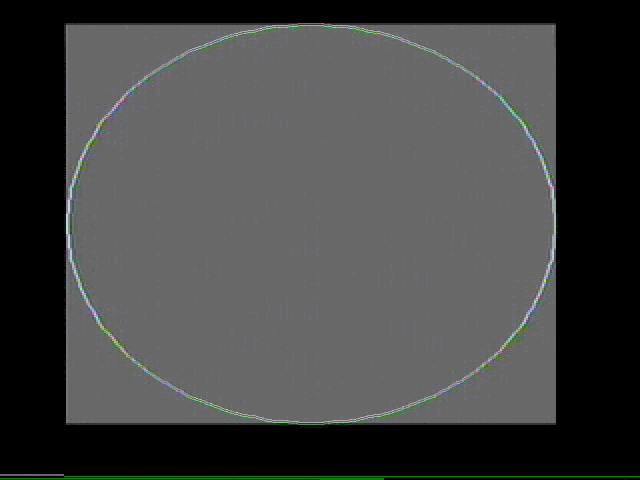
The images of the standard bitmaps were taken using the VICE so they are very sharp. I had to use a video capture card for the interlaced images. I appologize that they do not appear on this web page anywhere near as nice as they appear on my TV. This is due to several factors. First, the video capture image was not perfectly stable even in normal, non-interlaced, mode. Second, the software with my video card allows you to take snapshots, but they are single field only! (You need two fields for an interlaced image). I was able to capture the interlaced images by making a video and extracting images from that. That results in further degragation due to MPEG (a lossy) video compression. Finally, the extracted .BMP files were converted to .GIF for the web page. So just remember, the VIC-IIe produces interlaced images much better than you see here.
| Introduction |
After reading about how the Atari 2600 can do interlaced video, I began wondering if it could be or has been done for the C64. After reading many articles, it appears it is not possible... the closest thing I read about is called IFLI a video mode for the VIC (C64 or C128) that alternates bitmaps every field for the purpose of blending colors and smoothing pixels. This does not create an interlaced (400+rasters) video image. 
In NTSC video, interlacing is achieved by sending a non-integer number of rasters each field (2 fields per frame called even and odd). Even fields start in the middle of a raster, which is to say, the first raster is a half-raster then all remaining rasters in the even field are complete, full rasters. Then the odd field starts and begins with a full raster, but it ends with a half-raster, all ready to start again with the next even field. The even/odd nature is determined by timing of the vertical synchronization (v-sync) pulses that mark the start of a new field. Also, I think the color burst may be phase-reversed between even/odd fields.
 After reading (in an article of Commodore Hacking probably) about how the C128's undocumented test bit of the VIC-IIe works (it makes VIC skip rasters!), I wondered if that could be used to produce interlaced video. Well, I got a Commodore 128 recently and decided to test the idea. First I needed to know when the VIC produces the v-blank and v-sync pules (i.e., on which raster according to VIC). After doing more research on the www, I was unable to uncover any information. This again leads me to believe this has never been done before.
Update: A member of the C128 Alive forums, mysticshadows, told me about a document by Christian Bauer that describes the VIC-II (not e) used in the C64. When I looked at it, I immediately noticed the end raster of v-sync / v-blank (40) is different from the C128 (see below) so I simply dismissed the document as irrelevant to the VIC-IIe. However, after completing my demo, I re-examined the document and noticed the start raster (13) is the same. This may be important for people who want to try this on PAL video systems because the same document states that PAL v-blank starts on VIC raster 300.
| Development |
 By playing with the test bit, I was able to completely eliminate the v-sync. This produces a rolling video display. With a rolling display, I was able to see (by changing border color with an interrupt routine) when the v-blank starts and when it ends. V-sync occurs in the middle of v-blank so I can't be sure of its location, but by deduction (which rasters I needed to kill to roll the screen) I developed a theory. Through these experiments and references to the NTSC standard and the Atari TIA chip documentation, I have made several conclusions.
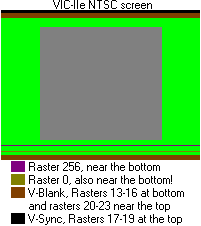
- VIC-IIe probably produces odd fields (first raster looks full)
- V-Blank starts on raster 13 ($0d) and lasts 1 raster
- Pre-Synch starts on raster 14 ($0e) and lasts 3 rasters
- V-Sync starts on raster 17 ($11) and lasts 3 rasters
- Post-Synch starts on raster 20 ($14) and lasts 3 rasters
- V-Blank resumes on raster 23 ($14) and lasts 1 raster
- Video starts on raster 24 ($18) and lasts 251 rasters
 With this information, I wrote a single-cycle-exact interrupt routine (using a double interrupt technique) that has two parts. If you are looking for the source code, there isn't any! I wrote it in the C128's ML Monitor. $1300 enables the interrupt routine and $1340 disables it. $1400 contains the code for even fields and $1440 contains the code for odd fields. Also there is common code at $13e0 to finish the interrupts, and at $1480 to perform the double-interrupt synchronization. The technique used is simply to 'cut' rasters from the VIC's output at the appropriate time by setting the undocumented 'test bit' located in bit 1 of register 48 (memory mapped to $d030 in the Commodore 128). In essence,
 LDA #2 ;value for bit 1 on
LDX #0 ;value for bit 1 off
STA $D030 ;test bit on, skip a raster for each clock cycle
STX $D030 ;test bit off, resume normal operation
Then I experimented with different 'cut times' to create an interlaced effect. When I got an 'interlaced' image I was really exited! In hindsight, it may not have been true interlacing. Since then, I have conducted further experiments, done more research on NTSC, refined the method, and developed a theory of how this works. Now I am quite confident this is producing a real interlaced image. For comparison, I first present a normal vertical sync (normal for VIC).
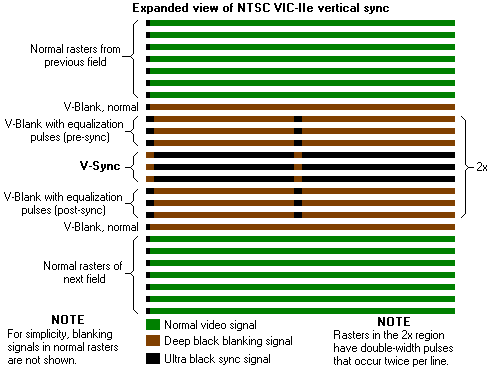
Notice the v-sync starts at the beginning of a raster. This indicates to a TV/monitor the start of an odd field. Next is an illistration of my method of creating an even field.
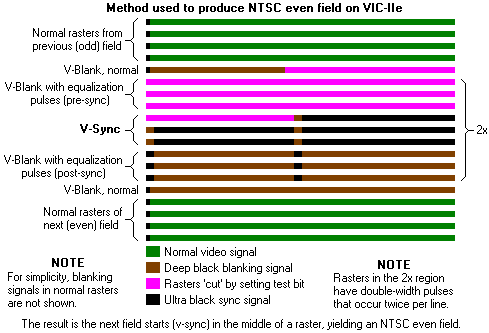
By briefly turning on the test bit in the middle of the pre-equalization pulses, VIC skips rasters only to resume with a vertical sync pulse in the middle of a raster. Starting v-sync in the middle of a raster indicates to a TV/monitor the start of an even field.
There are two primary consequences of this method. First, since VIC is skipping rasters, fewer rasters are generated per field resulting in a faster than normal field rate. Approximately an increase from 60.05Hz to 60.75Hz (1.16% faster). Second, the 'cut' rasters are those containing pre-sync equalizing pulses. These are not needed by modern equipment, but may cause trouble for very old equipment. In particular, the 1980's saw the introduction of digital tuners (anyone remember the mechanical knobs before that?) and presumambly digital control of synchronization occurred about the same time.
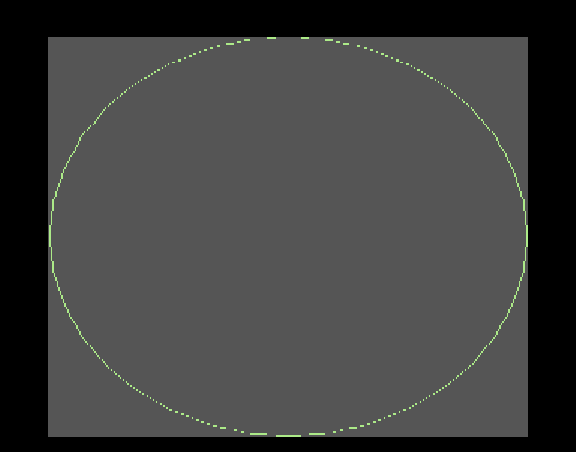
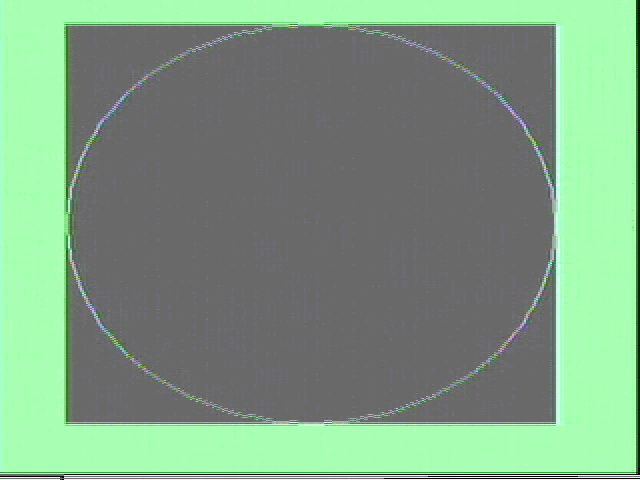
| My first 320x400 bitmap: a circle |
 Next I created a BIG circle bitmap. I started with the BASIC CIRCLE 1,160,199,159,199. This made a standard 320x200 bitmap of (the top) half of a circle. Through some copying, mirroring, and stripping, I eventually ended up with two standard bitmaps that are the odd and even fields for the 320x400 interlaced bitmap. These are on the disk image as BM0 and BM1.
BM0 contains what I call even rasters, representing 0,2,4,6...398 (but its a normal bitmap so these appear as rasters 0...199 with missing segments). The first raster has a segment in the middle and the last raster has a gap in the middle. BM1 contains what I call odd rasters, representing 1,3,5,...399. The first raster has a gap in the middle while the last raster has a segment in the middle. Neither bitmap by itself could be called a circle because of missing segments.
 With the bitmaps, I went back to the interrupt code and made it switch VIC video banks for each half of the interrupt code. With the bitmap(s) on screen, it was obvious that my 'interlacing' was wrong so I continued experimenting. I finally found a method that produced a good result and announced my invention on the C128 Alive! forums. I said I would make a demo so that's what I did next.
| Program Description |
 The demo program (DEMO on the disk image) is a (uncompiled) BASIC program. It loads the interrupt code and some support routines from the file 'CODE 3'. It sets BASIC's start of variables to $c000 and then loads the two bitmaps into Bank 1 RAM at $1c00 and $9c00, respectively. The main menu gives you 4 options. These are
- Calibrate Interlace
- View bitmap
- Directory
- Quit
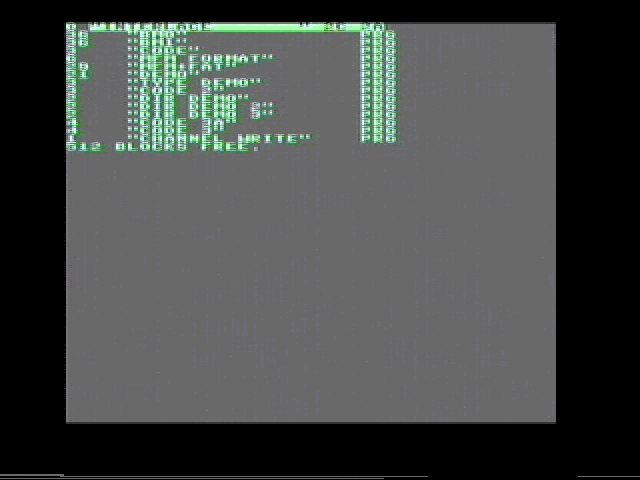 Note that BASIC and the KERNAL like to disable interrupts at their convenience so there WILL be some flicker in the display while the directory is actually being read from disk, but the display will 'stabilize' once the disk access is complete. BASIC sure is slow at reading bytes from the disk, so after the file size is read, an ML routine is called to actually read the filename and type. I think at $1580. $1500 contains code to plot a character (screen code in .A) on the emulated 40x50 screen at the x,y position stored in $14fe,$14ff. Code to write a line of text starting at $c01 (length in $c00) is at $1540, I think.
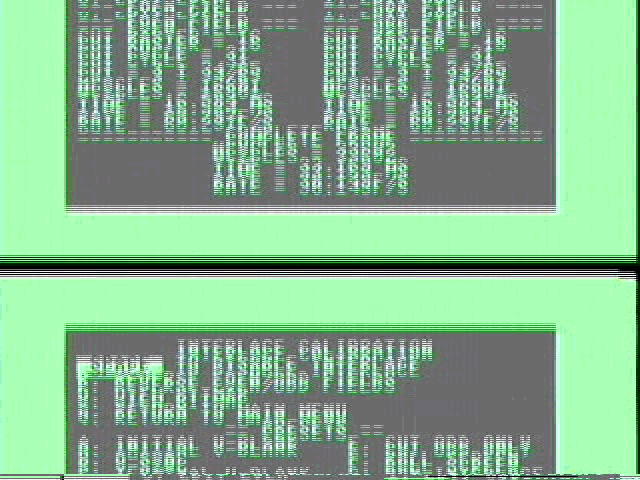
| Interlace Calibration |
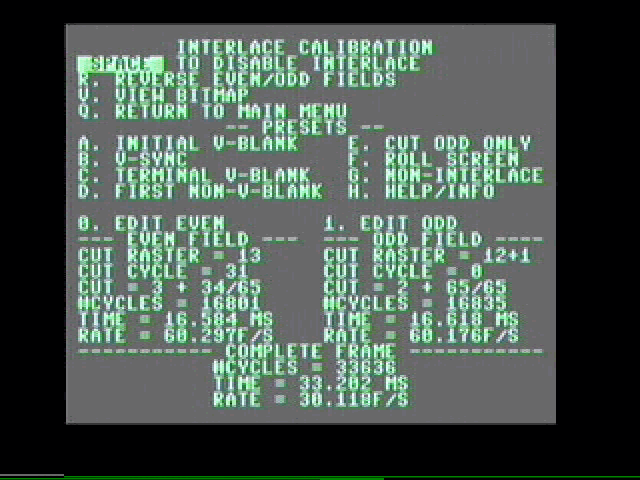 Finally I wrote the calibration sub-menu. It contains several preset values you can try to see which (if any) produces interlaced video on your TV or monitor. These are options A, B, C, D, and E. For fun and comparison, preset options F and G permit a rolling display and no interlace, respectively. Option H (or the HELP key) will give you a description of the options and information about the rasters VIC uses.
The current settings and some statistics are shown at the bottom of the screen. The settings for each field are shown and can be edited. Below the field statistics are the statistics for a complete frame. In either case, the statistics are:
- Number of cycles in frame (or field). A cycle is approximately 1 microsecond.
- Duration of frame (or field). Given in milliseconds. Equal to cycles * 14/14.1828MHz.
- Frame (or field) rate. Given in Hertz (Hz). Equal to 1/duration.
| Customizing |
 Since none of the presets may work with your TV / monitor (except F and G, but they are not interlace modes), you can fine-tune / experiment in two ways. The first is very simple. If the menu looks ok with interlace enabled, but the bitmap looks 'wrong', use the R option to reverse the even and odd fields; this is a global option.
The second, more advanced method, is to edit the settings of each field individually. Press 0 (zero) to edit the even field settings or 1 (one) to edit the odd field settings. This erases the statistics and adds editing options. Note that all options are still accessible while editing, but you can remove the editing options and restore the statistics by pressing the ESCape key.
The editing options allow you to change 3 items:
- Cut Raster is the VIC raster where the test bit is enabled.
- Cut Cycle is the cycle (0...64) in the raster where the test bit is enabled.
- Cut is the amount of rasters to be cut, expressed as raster integer + fraction.
The way the interrupt code is written, the Cut Cycle can only be changed in increments of 2, normally restricting you to odd cycles, but you can wrap around to the next raster which allows cutting on even cycles.
I think this editing / experimenting feature is great. I wish I had done that first since it is so much quicker and easier than editing code in the ML Monitor!
| Experimenting |
A good way to experiment is to select a preset, A...E and then press the space bar to see the effect. If the screen is shaking horribly or not all, press space bar to disable the 'interlace'. Note if the setting is very good, you may not really notice the jitter that is inherent with interlace video. When (if) you get a stable display, press V to view the super hi-res bitmap. Hopefully one of the presets will work for you. If not, select the one you think is best and try editing the settings. Have fun!
While experimenting, I found several settings that were almost right, which is why having the bitmap is very handy. The bitmap should have thin, distinct rasters, and of course should look like a circle. The rasters should not overlap. If the display seems stable but the circle looks 'wrong', try reversing the fields by pressing R in the calibration menu. Certain settings, on my TV anyway, produce a stable but 'crazy' interlace effect where half (top or bottom) appears correct but the other half appears reversed.
Some settings produce a color artifact I call rainbowing. I believe this is due to the generation of odd fields and the fact that VIC does not reverse the phase of the color burst (or it does and they are reversed the wrong way). Its hard to describe since the background is still dark gray and the characters/pixels are still (mostly) light green, but it is clearly visible in the screen shots. Note all screen shots I made show this effect, even without interlace enabled! It must be due to my video capture card. On my TV, the rainbow effect is not present with the right settings.
Hopefully you'll find a nice setting that shows a super-smooth circle with very little jitter. If you do, the final test (only available from the main menu) is the Directory. Once the directory display is complete (there WILL be jitter while it loads), it should show little jitter and the text should be very legible (small but legible). Preset 'A' works best for me, but preset 'E' is not as good: the circle appears OK while the directory text is blurry (mostly illegible). A great of example of a 'bad' display can be produced by selecting preset 'G' (non-interlace) from the Calibration menu and then viewing the circle or directory.
| Creating |
Recently I became interested in creating something more exciting than a circle. As far as I can tell, my photo editing software doesn't allow me to split an image into two seperate files for interlacing. So I wrote a program that does just that.
Here you can download the Windows command line utility. If you're wondering why I zipped a 24ki program, it's because this server reports 'invalid filename' when I try to upload splitbmp.exe. Stupid server, that's a perfectly valid filename! Anyway...
Simply tell the program the name of a BMP file and it will create two new BMP files suitable for interlacing. Its a very simple program, and consequently is very picky about the type of BMP file. It must be non-palettized, uncompressed, 24bits/pixel. The height doesn't matter, but the width must be less than 4000 pixels.
 Using that program to create an interlacable set of images, I then used a nice program available for editing images to suit the VIC-II(e) called Timanthes and should be available at the C64 Scene Database. Its important when transforming the colors to the VIC-II pallette that each field has opposite dithering options. It doesn't matter if you select even or odd dither for your even field, but, be sure to select the opposite for your odd field.
I wanted to make a quick picture to see how things would turn out. It is a simple multicolor bitmap, only interlaced. A good C64 grapher could probably do this good without interlacing using some skill and a more advanced mode such as (A)FLI. But for its simplicity, I like my results.
© H2Obsession, 2007